Build a Personalized Campaign For Higher ROI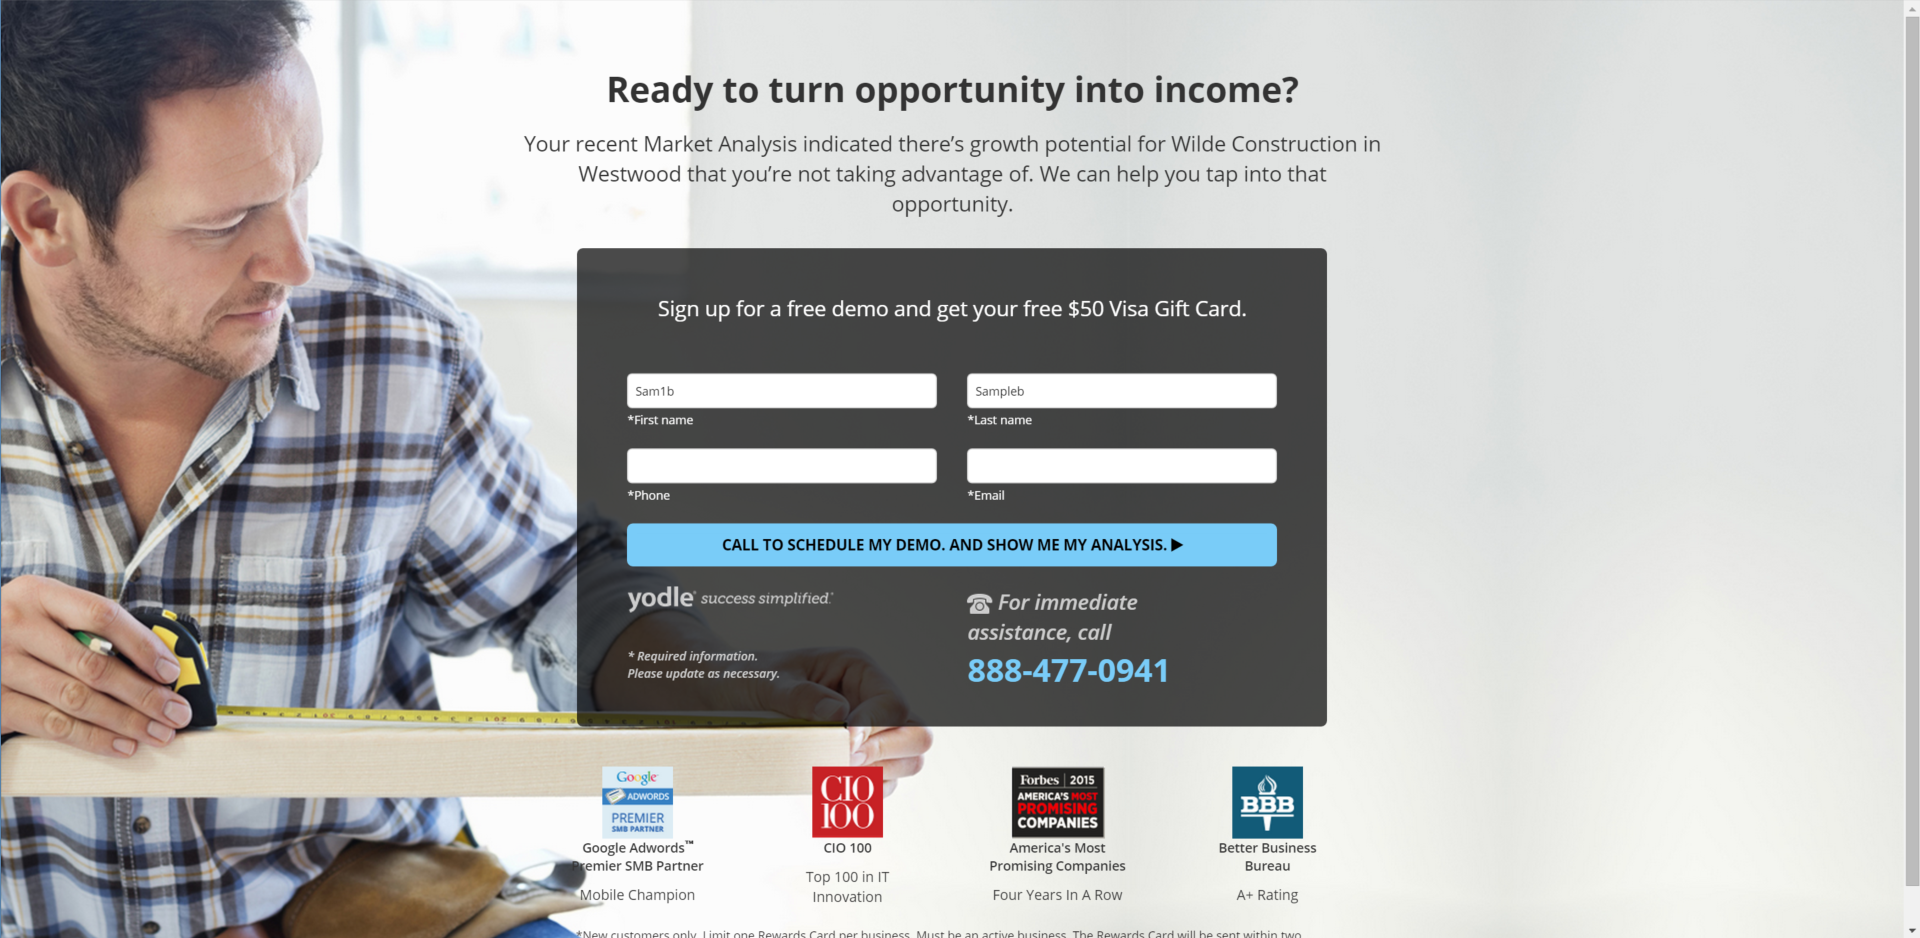
Boingnet gives you the power to create data driven, multi-channel marketing campaigns called “Personalized Campaigns“. At the heart of Personalized Campaigns lie pURLs, or personalized URLs, for each person on your contact list. pURLs make it easy to send each of your campaign targets personalized messages across direct mail, web landing pages and email, with one to one tracking for each response.
Multi-channel Marketing With pURLs
Research shows that by personalizing the user’s experience and by providing the user with as much relevant content as possible, your conversion rates and brand engagement skyrocket. Our campaign creation process allows you to include web forms and surveys in your Personalized Landing Pages making it easy for you to understand your customer’s needs. Boingnet’s triggered Drip Nurturing Campaigns allow you to react to your customer’s responses immediately. A well-designed Personalized Landing Page will not only make your customer engagements feel more like conversations, it will also maximize your conversion rates. Below is a small sampling of ways you can use our pURL-driven Personalized Landing Pages:
- Include pURLs on your direct mail to link your customers to their personalized landing page within your website.
- Include pURLs in your email blasts to direct customers to their own microsite about your company’s products or services.
- Use a QR code on your business card to direct business contacts to a landing page detailing information about your products or services.
- Use pURLs in your email blasts to send your best customers special promotions and coupons.
- Use pURLs in your direct mail to survey your customers and track their responses.
- Use pURLs in your email reminders to give customers an easy way to confirm appointments they have with your office.
Great landing pages are focused around a single message and highlight a clear call to action. They are a classic KISS principal item for marketers. One other thing – landing pages can be hard to design properly for use on phones or tablets. Don’t worry about that when using Boingnet, we’ll make it easy for you when you use our templates. (We can also build them for you – contact our Marketing Services Team to get a quote).
Before You Start
There are a few things to get in place before you create your Personalized Campaign. If you spend some time structuring them up front, you’ll save a lot of time in the process:
- Import a Contact List – Lists of your contacts, with fields designed for personalization and data capture, are needed to start
- Create Page Templates, Email Templates and Microsites – Your landing page and email creative will shine using our tools
- Get your Domain Set Up – think about using a Vanity Domain for speed and ease of use
- Develop your pURL Format and Style strategy – you have many options that work for different campaigns
To Create a Personalized Campaign:
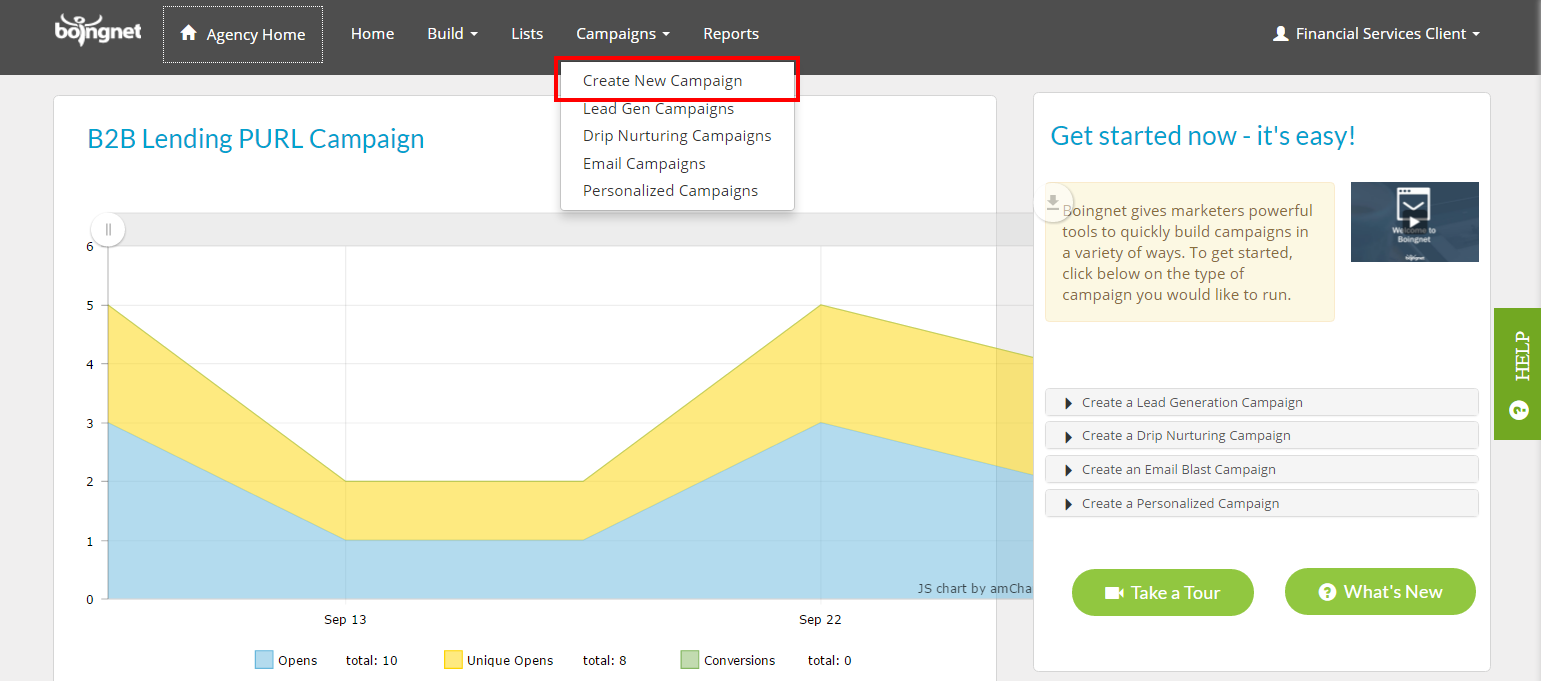
From the main navigation bar, click on Campaigns, then select Create New Campaign:
On the next page, select the Personalized option:
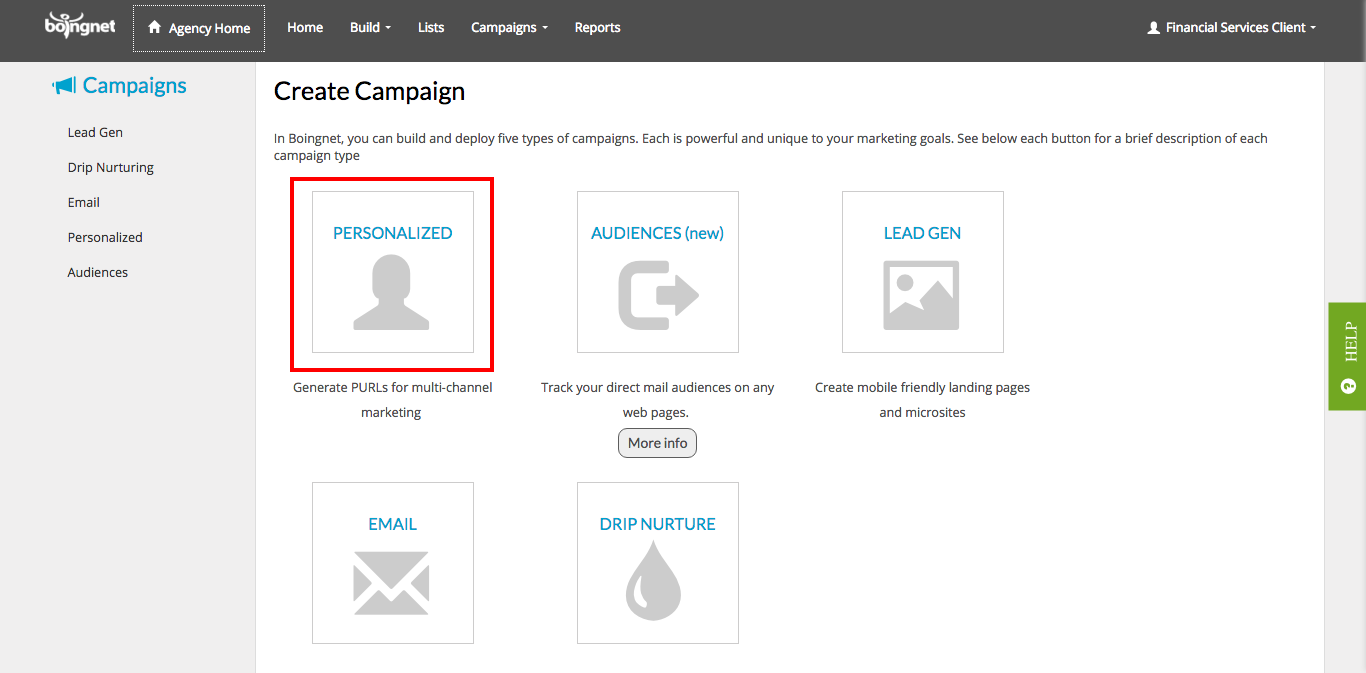
The Personalized option will let you generate individual or personal URLs (pURLs) for each of your contacts. You can then edit your campaign to add various channels (email, SMS, print) to communicate with your contacts and drive them back to their pURLs for a one to one marketing engagement:
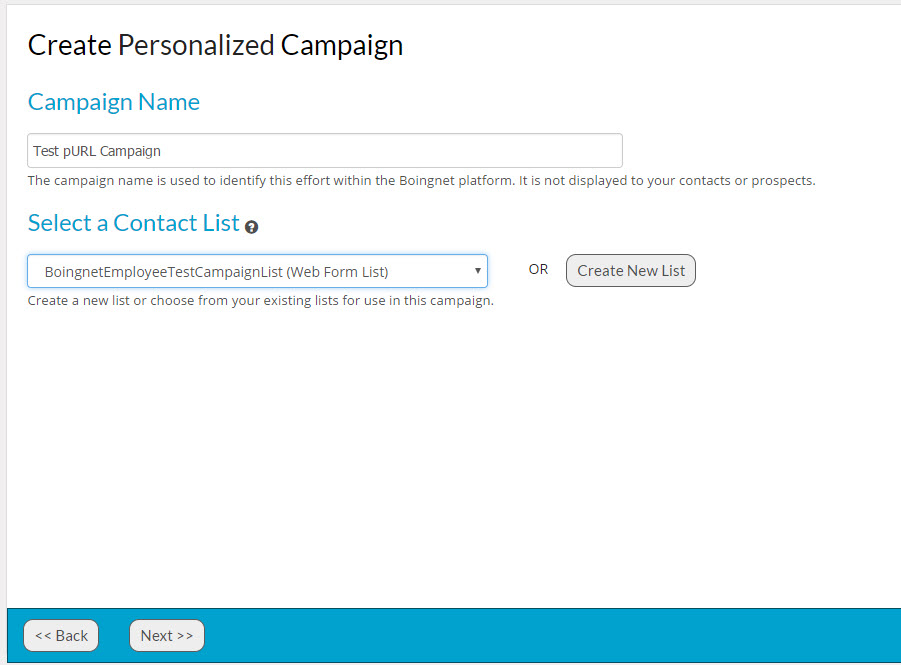
Campaign Name: Enter a name for your campaign. This name just identifies your campaign within Boingnet for reporting purposes and will not be visible to your contacts.
Select a Contact List: Click on the contact list you want to use for this campaign from the drop down menu OR click Create a New List to upload one. Visit our Add a Contact List page to learn more.
Click on the Next button to set up to format of the pURLs for your campaign:
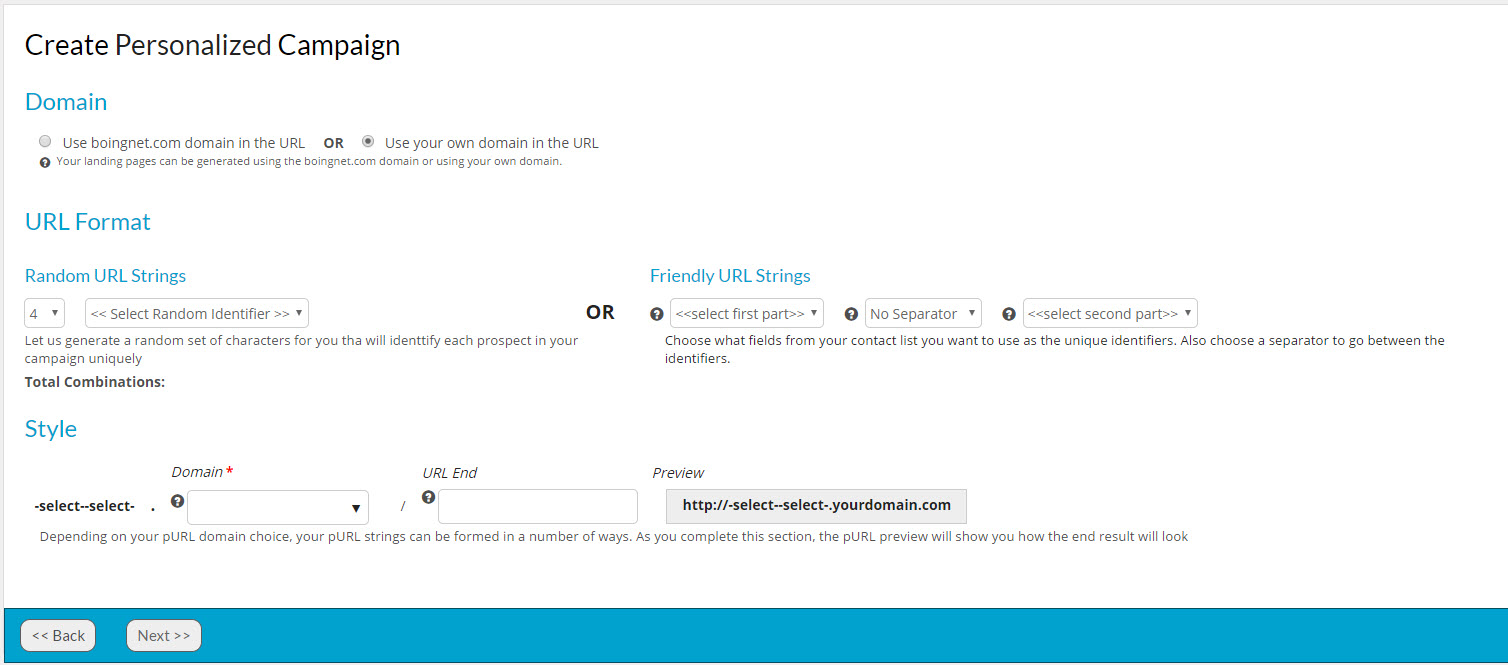
Domain: Select the Domain you will be using for your campaign. You may use the pages.boingnet.com domain or your own domain in your pURLs. If you want to use your own domain you’ll need to add it to your Boingnet account. Visit the following page for more information: Configuring a Domain.
URL Format:
Boingnet offers two very different pURL formats – Random and Friendly URL Strings.
Random URL Strings will generate randomly selected letters, numbers or both for you. You choose the length of the character string. Use Random Strings when data privacy or fixed domain length are primary concerns.
For more on pURL format best practices – Click Here
or
Download The pURL Formats and Styles Quick Reference Guide PDF
Friendly URL Strings are chosen from the data fields in the contact list you’ve chosen for the campaign. In order to create uniqueness, you’ll need to choose two data fields. Most clients choose First Name/Last Name, in order to maximize the personalization of the creative. The length of the URL will vary based on the data in the contact list. The separator between first and last identifier is optional. If you choose first name and last name as your identifiers, then your pURLs will have the following format: FirstNameLastName.yourdomain.com
Style: Enter the URL end you wish to use in the URL end box. For example, you might want to use the name of the promotion or the date as the URL end. Any combination of letters and numbers will work, just don’t use special characters or symbols in your URL name. Using a URL end will prevent you from creating duplicate pURLs if you plan to use your domain for multiple campaigns. A preview of your pURL format will be displayed to the right.
After your URL is formed, Click Next to continue.
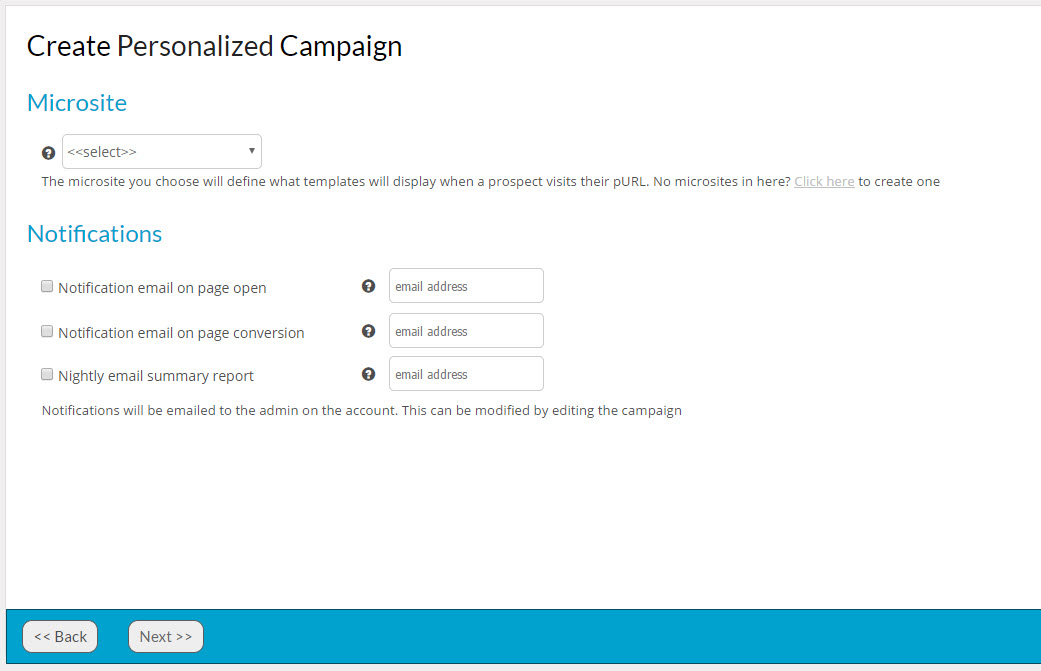
Microsite: Enter the microsite for your campaign, this will determine which template displays when your contact visits his or her pURL. If you have not yet created your landing page template, see the following pages:
Once you have created your landing page template, you are ready to create a microsite. If you have already created your microsite for this campaign, select it from the drop down menu. If you have not yet created one, visit our Create a Microsite page to learn more.
Notifications If you wish to have the campaign administrator notified when a contact opens his or her pURL, then click on the notification boxes. This is a great way to alert those who need to know that there is a hot lead expressing interest.
Click Next to get to Confirm Landing Page Details. Review all your campaign details to make sure everything is accurate and complete:
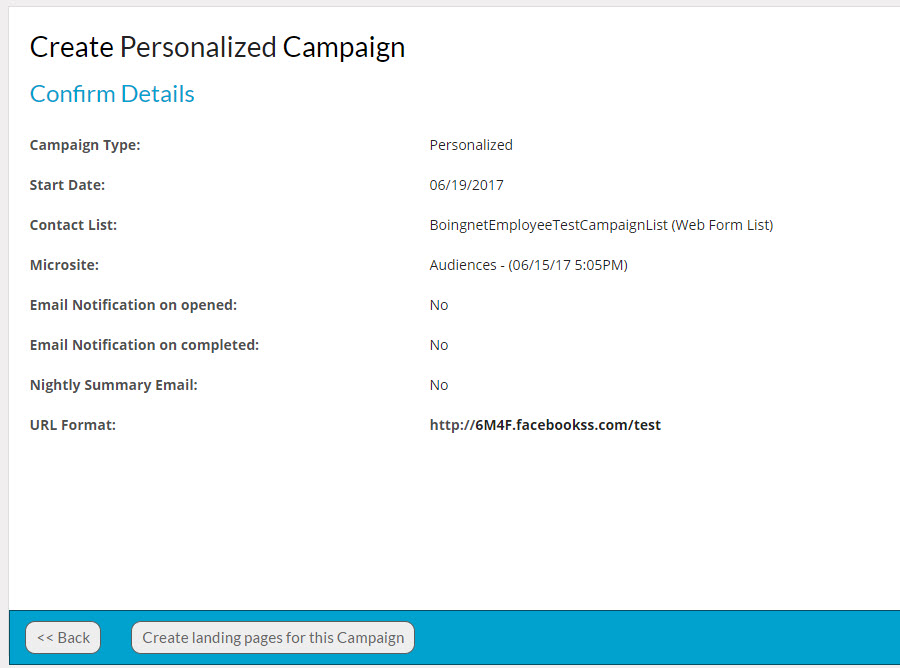
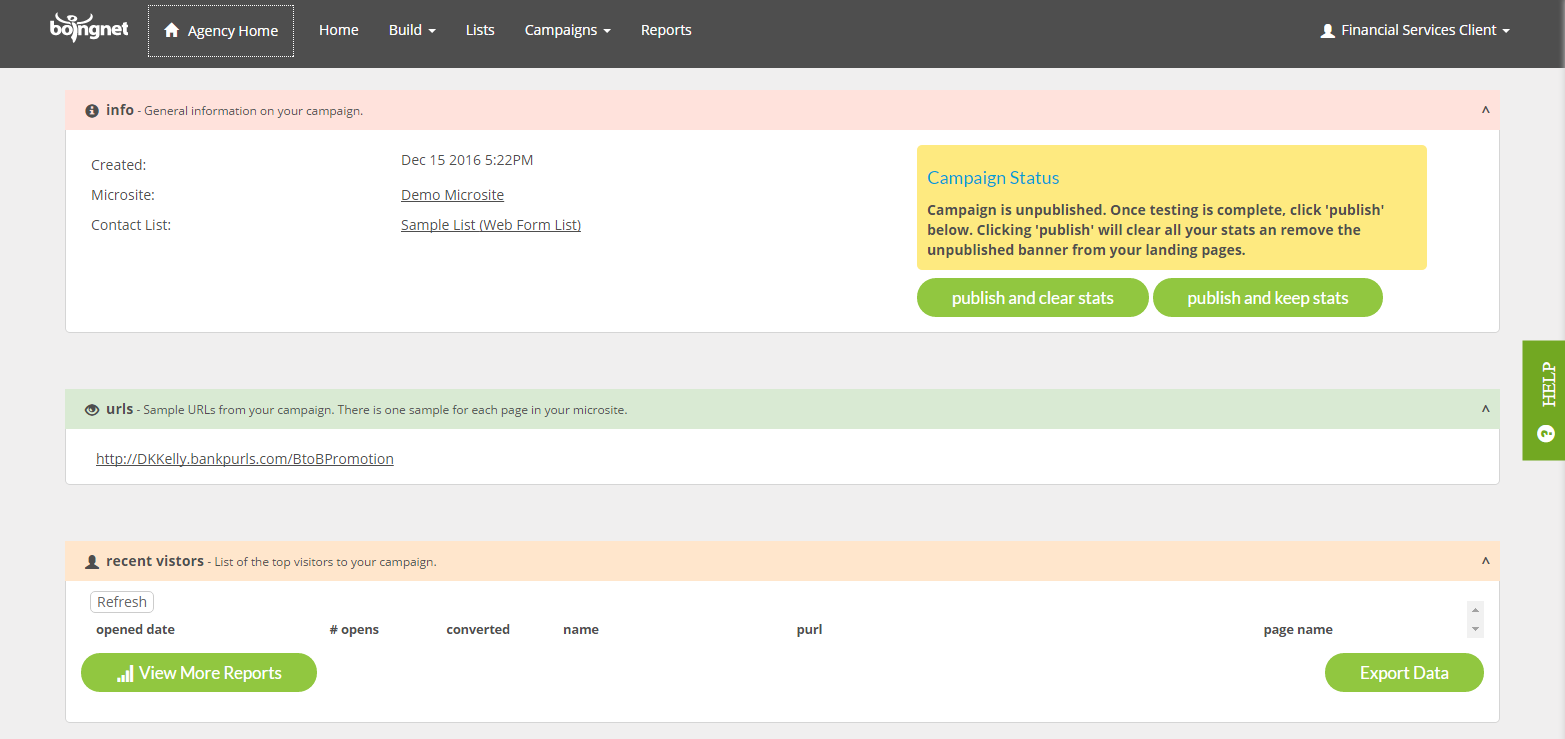
Click Create landing pages for this Campaign to generate your landing pages. This may take a few minutes depending on the size of your list. Once your pURLs have been created, you’ll see the following page:
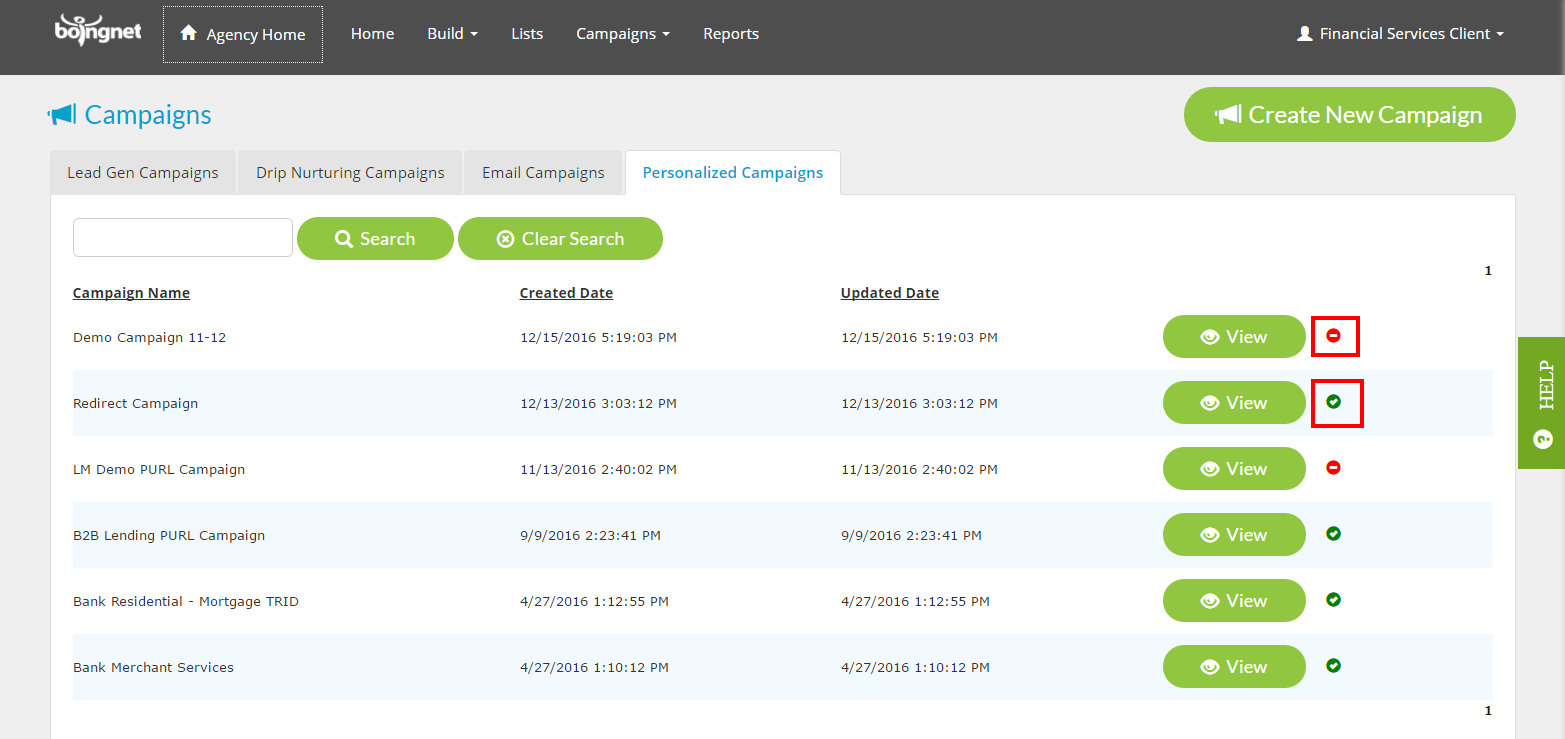
Your new campaign will be created in Unpublished mode to allow you to test your landing pages, reports and email notifications. While in Unpublished mode, a message “Landing Page is not published” will appear at the top of the campaign’s landing pages. Once you are done testing, you can click the one of the Publish buttons to launch the campaign. When published, the message on the landing pages will be removed. You have the option to keep or clear your test statistics when you publish your campaign. To keep your test statistics, click publish and keep stats, to clear your test statistics, click publish and clear stats. Your Campaigns page will display an indicator that lets you know which campaigns are Published and which are Unpublished:
A red dash indicates that the campaign is Unpublished, a green check mark indicates that the campaign is Published.
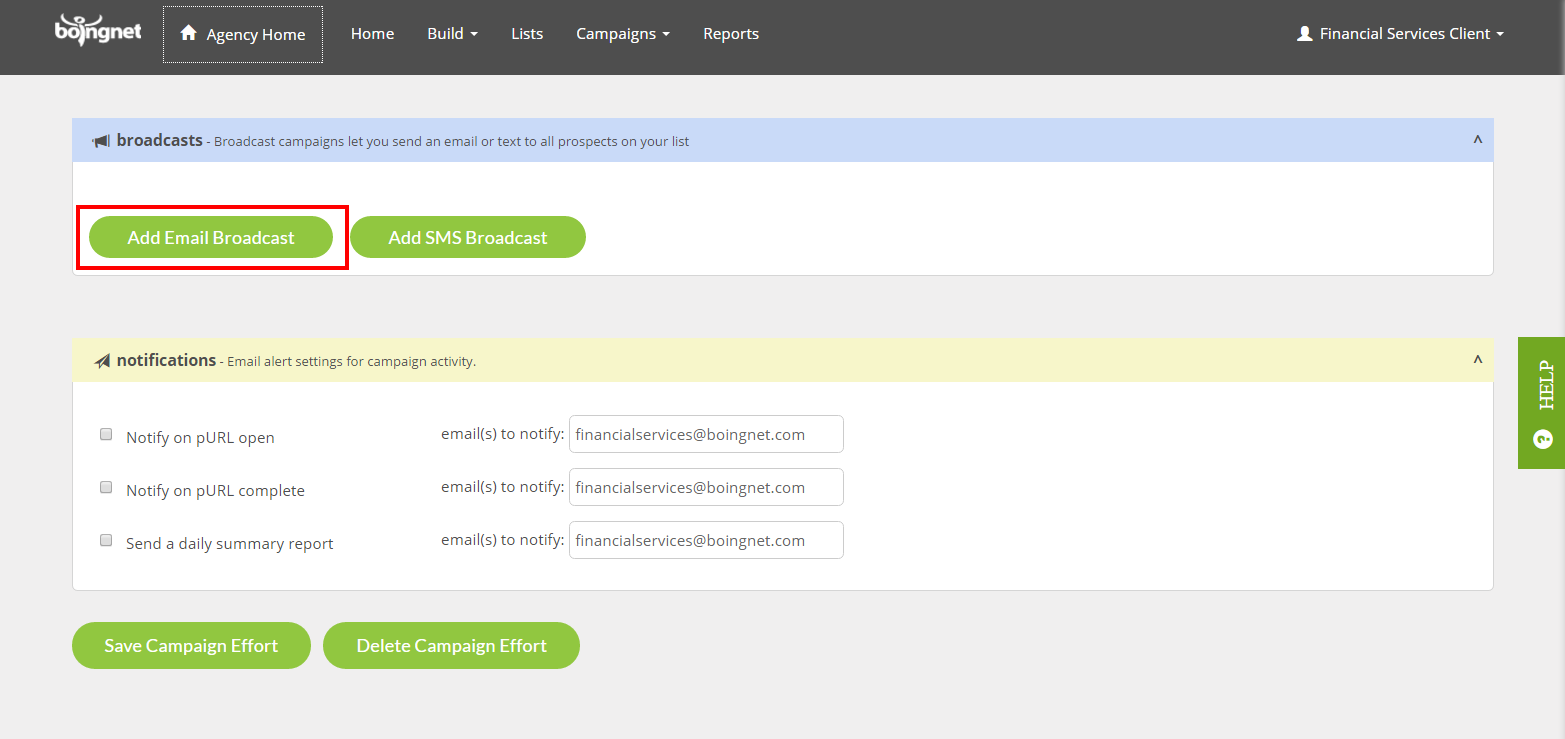
If you click the View button, you’ll be able to edit the campaign and add various channels such as Email and SMS to your campaign. You can also download your pURLs by clicking the Download button to send them to your printer if you’re using them in a direct mail piece. Or, you might want to send an email blast to your targets inviting them to view their pURLs. To set this up, scroll down to Broadcasts and click on Add Email Broadcast. If you can not select the Add Email Broadcast option it’s because your list has not yet been cleaned and prepared for an email campaign. Visit our Clean Email List page for more information.
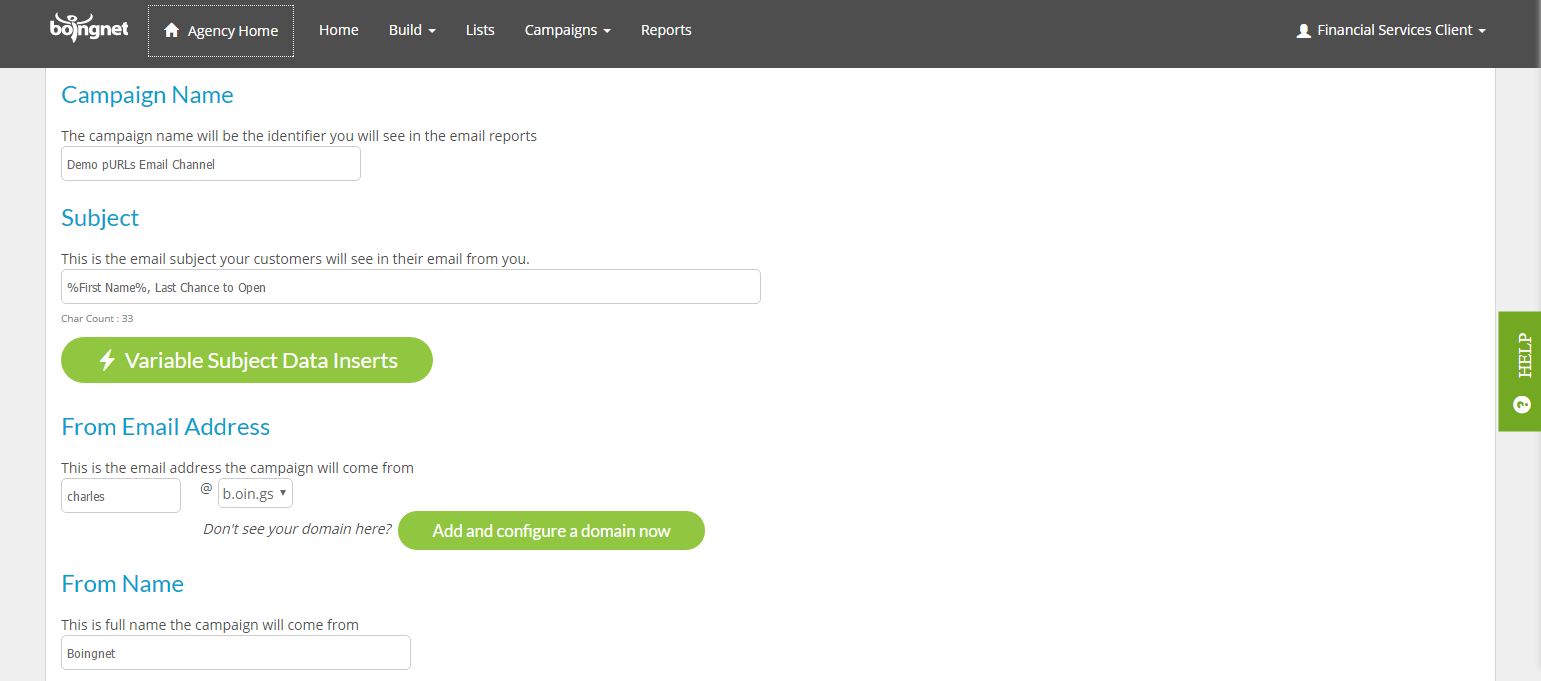
You’ll be directed to the next screen where you can define the email metrics for your campaign:
Campaign Name: This name just identifies your campaign within Boingnet for reporting purposes and will not be visible to your contacts.
Subject: Enter the email subject you want your customers to see here. This will also be the identifier you see in your email reports.
From Email: This is the email address the campaign will come from.
From Name: This is the full company name the campaign will come from. Do not include commas in your name or some ESPs (Email Service Providers) will truncate your name. For example: ‘Candy Company, Inc’ will become ‘Inc’.
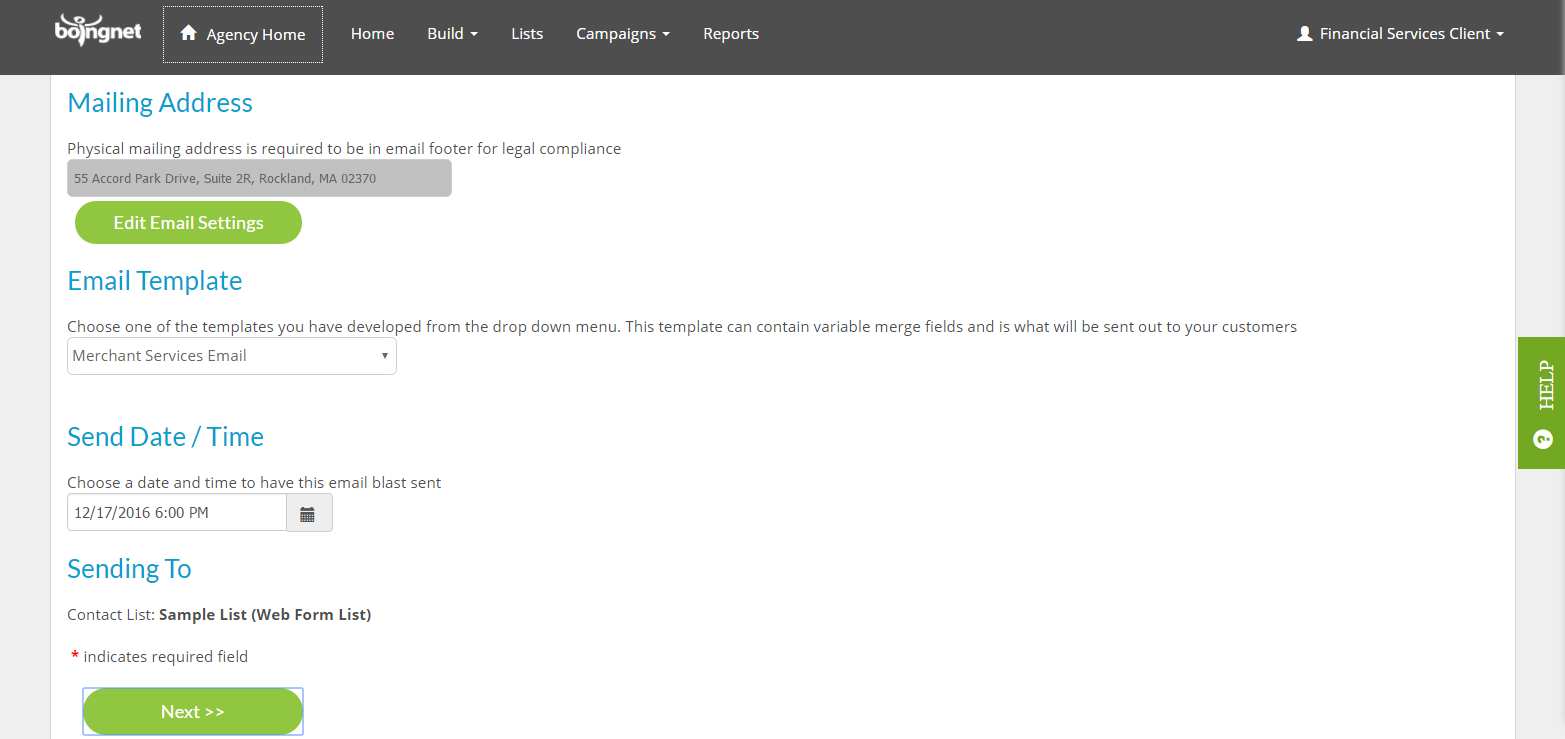
Next:
Mailing Address: This is required to be in an email footer for legal compliance. The physical address on your Profile page will display here and will be used on your email footer.
Email Template: Choose your email template from the drop down menu. If you have not yet created one, visit the following pages for more information:
Send Date/Time: Choose the date and time for the email blast to be sent.
Sending To: Make sure the correct contact list is displayed here.
Click Next >>
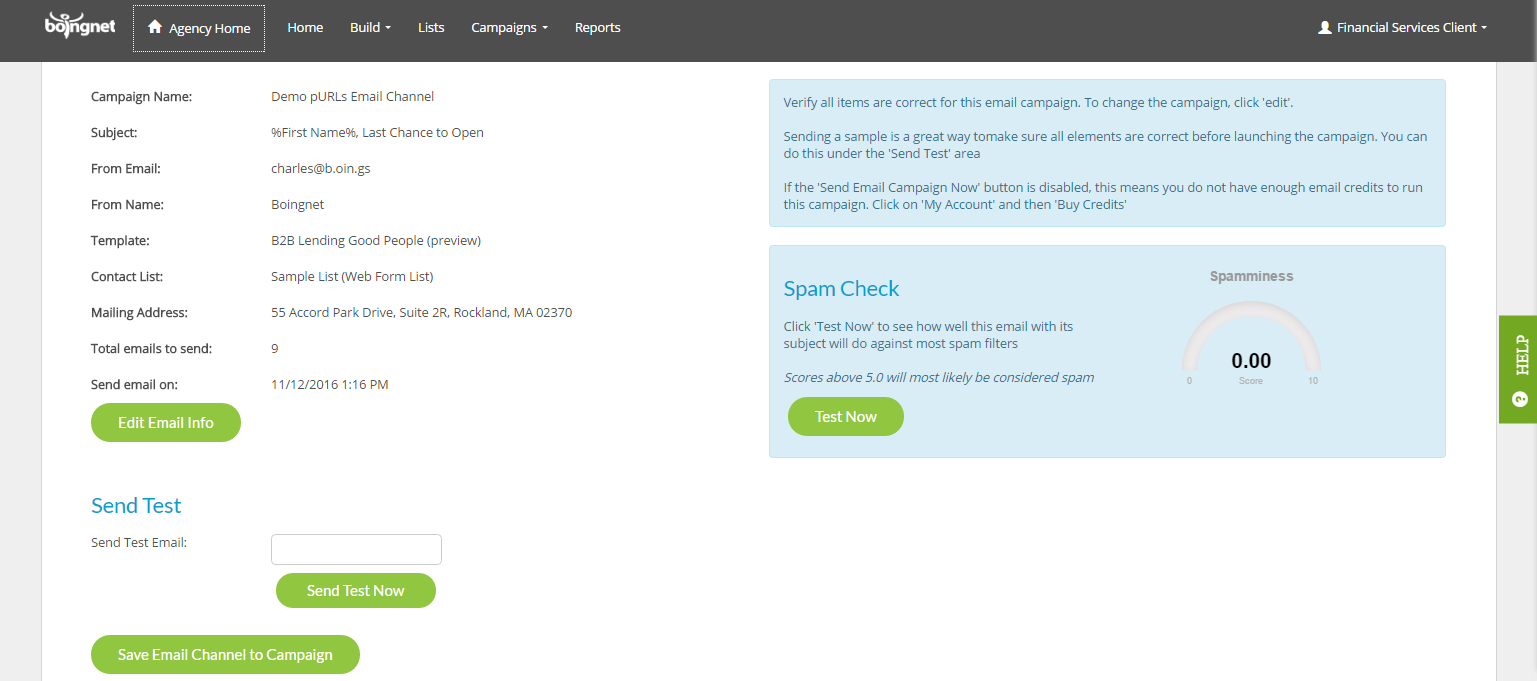
Review all the information on the Add Email Channel Confirmation page. Make sure that the email template, send date and time and contact list specified are correct. Click Save Email Channel to Campaign.
You can set up a Drip Campaign that can use email, print or mobile text campaigns to automatically follow up with your campaign targets. For example, you may want to send a 2nd email with revised messaging to only those targets who didn’t open their pURL within the first week of receiving their email, or you may want to send an email or text with a revised offer to those who opened their pURL but didn’t fill out a form you created. Visit our Add a Drip Campaign page to learn more.
Contact Our Support Forums for Help
We are perpetually seeking to evolve our product as well as our support process. If you didn't find your answer here take a moment to visit our support forums as well as submit your ideas on how we can bring Boingnet to the next level!
Support Forums

